Why Your Photo Actually Matters
Your ID photo isn't just decoration - it's the first thing people notice and the main way officials verify your identity. A good photo makes everything smoother.
Skip the photo booth disasters! Our simple guide shows you exactly how to take professional-looking ID photos at home. No fancy camera required - just your phone and these proven tips.
Your ID photo isn't just decoration - it's the first thing people notice and the main way officials verify your identity. A good photo makes everything smoother.

Nobody wants to retake their ID photo three times or explain why they look like they just rolled out of bed. Spend 10 minutes getting it right the first time, and you'll save yourself hours of frustration later.
Your smartphone is probably better than most cameras from 10 years ago. Here's how to make it work like a pro.
Any phone from the last 3 years will work perfectly. Even older phones can work great with the right technique!
Blurry photos are the #1 reason for rejection. Here's how to avoid them:
That smudge on your camera lens? It's probably been there for weeks and you don't even notice it. Give it a quick wipe with your shirt - it makes a huge difference!
You don't need a photo studio - just avoid these common background disasters.

Plain white wall - simple and clean

Light colored door - works perfectly

Busy pattern - way too distracting
The classic choice - works 99% of the time
Hang it up or have someone hold it behind you
Cheap from any store, works great in a pinch
Good lighting can make anyone look great. Bad lighting makes even models look terrible. Here's how to get it right.
Stand facing a large window during the day. The soft, natural light will make you look amazing - like those Instagram filters, but real.
If you can't use a window, regular room lights can work with a few tweaks.
Makes you look like a deer in headlights
Shadows hide your features
Light behind you makes you a silhouette
You're not trying to win a modeling contest - just look like a normal, approachable human being.
Keep it simple and avoid anything that might cause problems later.
Navy, black, dark gray - classic and professional
No patterns, stripes, or busy designs
Button-ups, polos - look put-together
Blends with background
Hides your face
Can be distracting
You don't need to buy a new outfit! Just pick something simple from your closet. Think "job interview" not "night out" and you'll be fine.
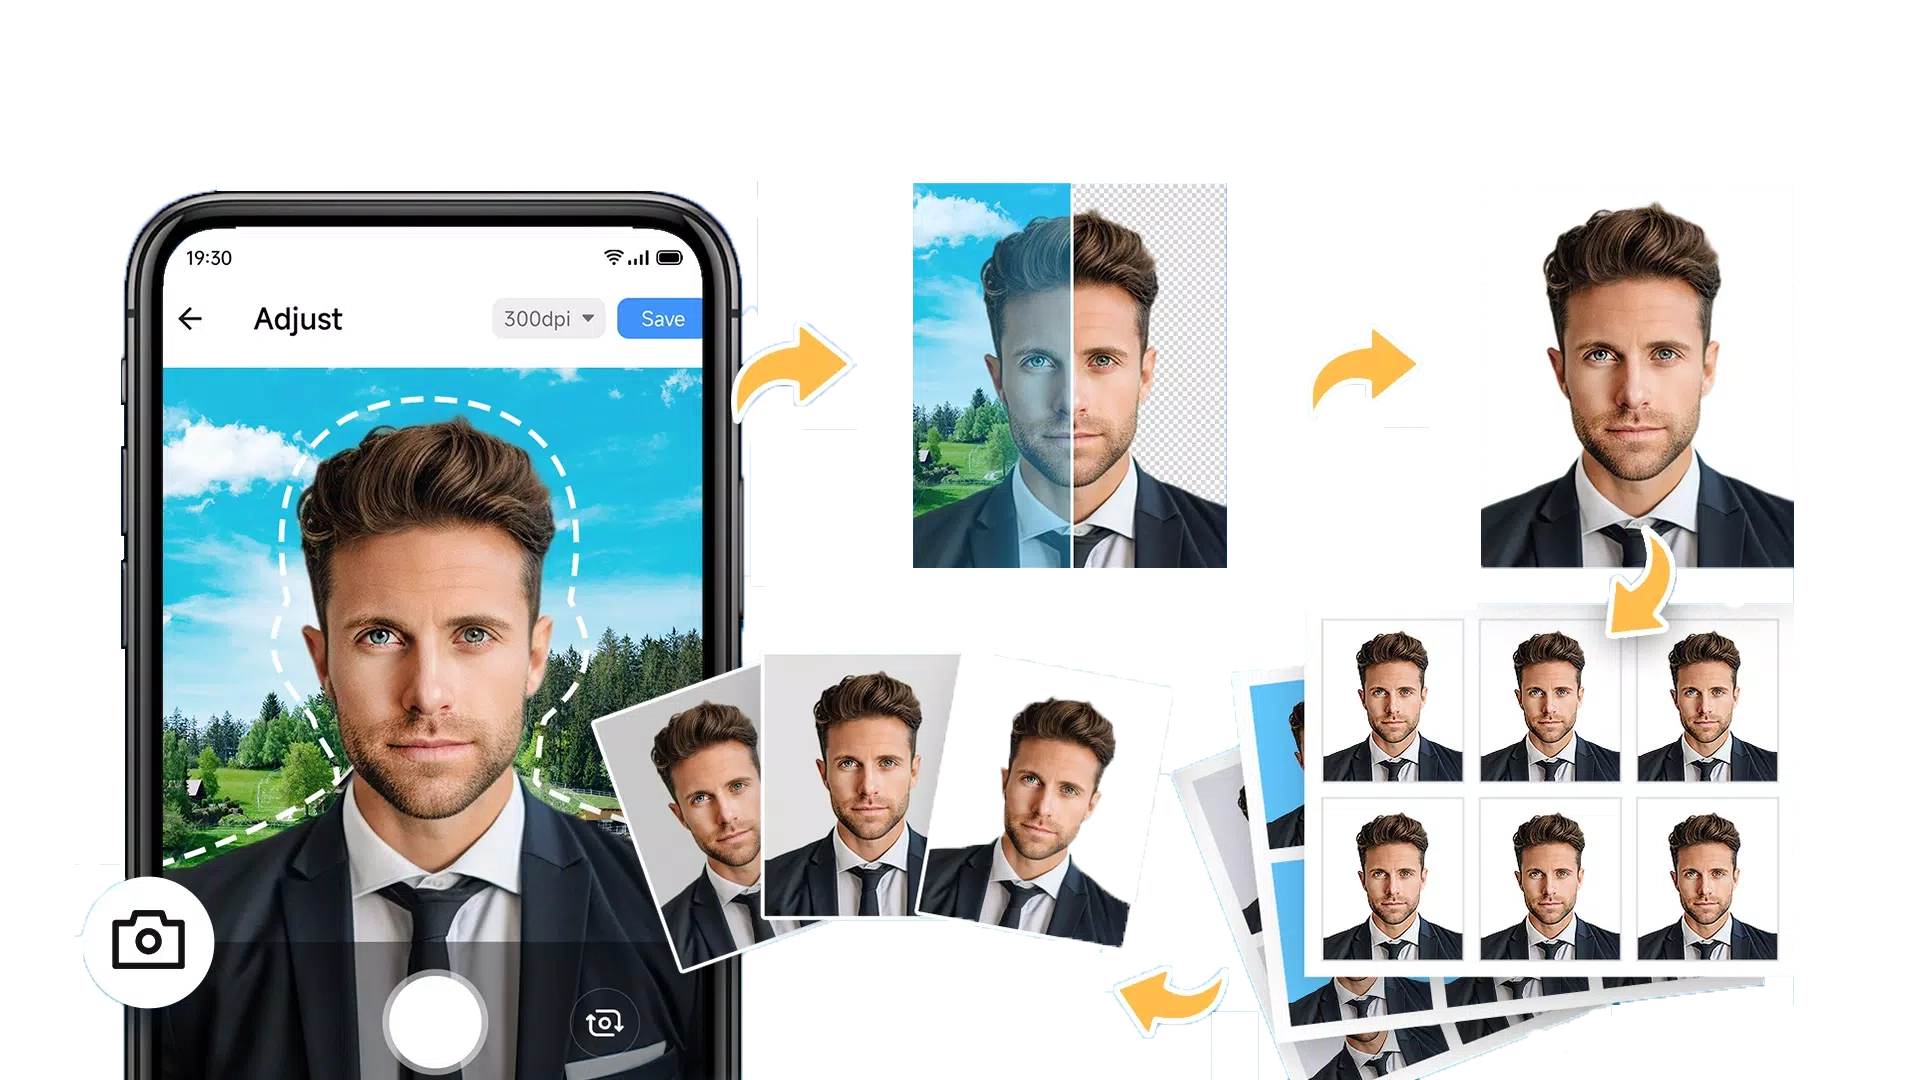
Almost there! Just need to crop and size your photo correctly.
Built-in photo editor works great for basic cropping
Free websites like Canva or PhotoPea work perfectly
Photo editing apps make it super easy
These little tricks can make the difference between an okay photo and a great one.
Seriously! Even professional photographers take tons of shots. You'll be amazed at the difference between photo #1 and photo #20.
Set a 3-second timer so you're not reaching for the phone when it takes the picture. This eliminates blur and awkward arm positions.
Spend 30 seconds in front of a mirror figuring out your best neutral expression. Then recreate it for the camera.
Position the camera at your eye level. Too low makes you look intimidating, too high makes you look small.
Before each shot, scrunch up your face really tight, then completely relax. This releases tension you didn't even know you had.
Ask someone else which photo looks best. Sometimes we're too critical of ourselves and pick the wrong one.
Learn from other people's fails so you don't have to experience them yourself.
Why it's bad: Selfie cameras are usually lower quality and the wide-angle lens distorts your face.
Do this instead: Use the back camera and either set a timer or get someone to help.
Why it's bad: Creates harsh shadows and makes your skin look pale and washed out.
Do this instead: Find good natural light or use multiple room lights.
Why it's bad: Too close makes your nose look huge, too far makes you look tiny.
Do this instead: Stand about 4 feet from the camera for the most natural proportions.
Why it's bad: Filters and heavy editing are often rejected because they don't look like the real you.
Do this instead: Just crop and maybe adjust brightness slightly. That's it!
Why it's bad: Rushing leads to blurry photos, bad lighting, and poor composition.
Do this instead: Set aside 15 minutes to do it properly. Future you will thank you.
Why it's bad: Patterns, objects, or other people in the background are distracting.
Do this instead: Find a plain wall or hang up a white sheet. Simple is always better.
Before you submit your photo, make sure it passes all these checks.
Let's check your photo!
Your photo meets all the requirements. You're ready to submit it with confidence!
Order Your ID NowYou've got all the knowledge you need! Follow these steps and you'll get a great photo that gets accepted the first time. No more photo booth disasters or awkward retakes.
The real questions from real people who've been through this process.